
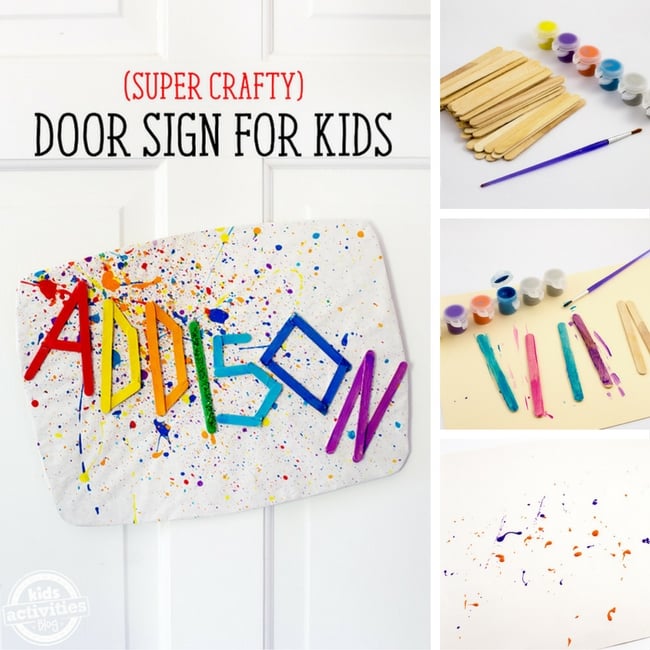
Tweens will love creating a wild, bright and colorful DIY sign for their doors. Whether kids make a door sign with their name or a message (like “Keep Out,” HA!), this kids door sign craft is a fun and creative way to occupy the time. Read on to see how to make this DIY Door Sign for Kids!

DIY Door Sign Craft for Kids
Make your room personalized, special and colorful with this super cute DIY door sign. This door sign craft is great for older kids, but with a little help preschoolers and Kindergartners can make it too.
This post contains affiliate links.
Supplies Needed To Make This DIY Door Sign For Kids

- Paint
- Wooden craft sticks
- Paint brush
- Glue
- Cardboard
- White paper
- Glitter (optional)
How To Make This DIY Door Sign For Kids
Step 1

After gathering supplies, begin by painting the craft sticks. Use several coats of paint to create the brightest colors!
Step 2
If desired, sprinkle some of the craft sticks with glitter.
Step 3
When the craft sticks are dry, kids will need to use scissors to cut the painted craft sticks into letters.
Step 4
Most craft sticks cut pretty easily with scissors for older kids, but younger kids will definitely need help with this step.
Step 5

Next, kids can dip their paintbrush into their paints and splatter paint a white piece of paper. To do this, show kids how to gently tap their paintbrush over the paper, creating drips and splatters on their paper.
Step 6
Allow the paint splattered paper to dry completely before taping it to a sturdy piece of cardboard.
Step 7
Last, invite children to glue down their wooden craft sticks to make their name or phrase.
Step 8
Allow the glued craft sticks to dry for several hours before hanging the sign on a door.
Step by Step Visual Guide for Making Personalized Door Sign
Some Of Our Favorite Woods Signs and Plaque For Kids To Decorate For Their Room
You can make a more permanent sign using a more sturdy base and here are some of our favorites to use:
- Wood Slice Basswood Plaque
- Pack Of Round Wood Craft Slices
- Unfinished Wood Blank Rectangle Hanging Signs
- Darware Wood Beaded Blank Plaque
- Unfinished Wood Rectangle Shaped Wood Slices
- Rustic Wood Signs Blank
- Wood Door Knob Hanger Unfinished Wood
Fun Quotes and Things To Write On Your Kids Room Door Sign
There are so many things you can write on your personal bedroom sign. Kids can be creative and design their signs anyway they want. Some of our favorite things that you can put on you kids room door sign are:
- Their name
- Their name + room (Ex: Daniel’s Room)
- Name + Room + Keep Out (Daniels’ Room: Keep Out!)
- Keep Out!
- Do Not Disturb!
- Girl Cave or Boy Cave
- Do Not Enter: This Is (name) Room
- Kid Zone
- Messy Room: Enter At Your Own Risk
- Welcome To My Room
- Go Away
- (Name) Grotto
DIY Door Sign For Kids

Tweens will love creating a wild, bright, and colorful sign for their doors. Read on to see how to make this DIY Door Sign for Kids!
Materials
- Paint
- Wooden craft sticks
- Paint brush
- Glue
- Cardboard
- White paper
- Glitter (optional)
Instructions
- After gathering supplies, begin by painting the craft sticks. Use several coats of paint to create the brightest colors!
- If desired, sprinkle some of the craft sticks with glitter.
- When the craft sticks are dry, kids will need to use scissors to cut the painted craft sticks into letters.
- Most craft sticks cut pretty easily with scissors for older kids, but younger kids will definitely need help with this step.
- Next, kids can dip their paintbrush into their paints and splatter paint a white piece of paper. To do this, show kids how to gently tap their paintbrush over the paper, creating drips and splatters on their paper.
- Allow the paint splattered paper to dry completely before taping it to a sturdy piece of cardboard.
- Last, invite children to glue down their wooden craft sticks to make their name or phrase.
- Allow the glued craft sticks to dry for several hours before hanging the sign on a door.
More Popsicle Crafts From Kids Activities Blog:
- Popsicle Stick Mosaic Sun Craft
- Fall Popsicle Stick Crafts
- Yarn Wrapped Craft Stick Caterpillars
- 30 Popsicle Stick Crafts for Kids!
- Easy Popsicle Stick American Flags Craft
- Fairy Garden Observation Deck Using Popsicle Sticks
- Scooby Doo Crafts- Popsicle Stick Dolls
More Colorful Crafts From Kids Activities Blog
- Check out these other colorful craft ideas!
- Here are check out these 50 sock crafts.
Did your tweens enjoy this DIY activity? Let us know in the comments below, we’d love to hear!


0