
This preschool paper plate polar bear craft is so cute and requires just a few supplies along with our printable polar bear template. Kids of all ages will have fun making this cuddly polar bear and it makes a great preschool polar bear craft at home or in the classroom.

Easy Polar Bear Craft
While polar bears are certainly around all year long, we tend to talk about them more during the winter months because of their ability to live in arctic temperatures. This fun preschool polar bear craft is easy to make and requires only a few supplies.
Related: Print our polar bear coloring pages
Making a polar bear helps work on your child’s cutting skills, fine motor skills and sparks creative art skills. If you are working with younger crafters, you can cut the pieces out ahead of time.
This article contains affiliate links.
Supplies Needed for Paper Plate Polar Bear Craft
- White paper plate
- Pink and black marker
- Scissors or preschool training scissors
- tape or glue stick
- Polar bear template pattern
Directions to Make Polar Bear From Paper Plate
Step 1
Download the Polar bear craft template:
–> Print off the free pattern and use it as a guide to cut the half circle from the bottom of the plate. The easiest thing is to cut out the template and then use it as a guide to draw lines on your paper plate for cutting.

Step 2
From the half circle, cut out the head and the ear. This is what your pieces will look like once they are cut out.

Step 3
Tape or glue the head to the back of the plate so the tape or glue won’t be seen from the front.
Step 4
Use a glue stick to attach the ear to the head.
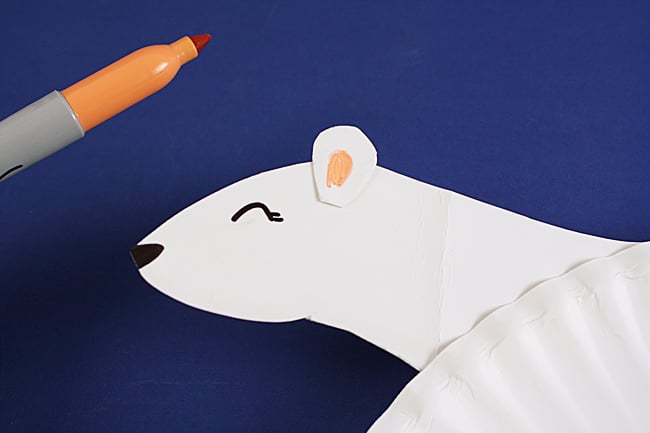
Step 5
Use a pink marker to color the inside of the ear, and a black marker to add a nose and an eye.

Finished Preschool Polar Bear Craft
If you like you can add a bow tie or a hair bow by cutting one from construction paper and gluing in place.
Fun Facts About Polar Bears
- Want something to talk about while making this project? Here’s some fun things you can discuss with your kids while they create!
- A polar bear’s skin is actually black, even though their fur appears to be white. Their fur is actually hollow and reflects light making it appear white.
- A male polar bear can weigh as much as 1,500 pounds.
- A female polar bear usually weighs in at only half of what males weigh.
- Polar bears have 42 teeth, 10 more than humans do.
- Polar bear cubs weigh only a little more than a pound when they are born, about 6 pounds lighter than the average human newborn.
- Polar bears have water repellant fur due to its oily nature, which allows them to quickly shake dry after swimming.
Make A Polar Bear Craft
Make this polar bear craft using only a few craft supplies. This polar bear craft is cute, fun, and easy for kids of all ages and is budget-friendly. Grab your polar bear template, paper plate, and a couple other items and make this adorable polar bear craft.
Materials
- White paper plate
- Pink and black marker
- Scissors or preschool training scissors
- tape or glue stick
- Polar bear template pattern
Instructions
- Download the Polar bear craft template.
- Print off the free pattern and use it as a guide to cut the half circle from the bottom of the plate. The easiest thing is to cut out the template and then use it as a guide to draw lines on your paper plate for cutting.
- From the half circle, cut out the head and the ear. This is what your pieces will look like once they are cut out.
- Tape or glue the head to the back of the plate so the tape or glue won’t be seen from the front.
- Use a glue stick to attach the ear to the head.
- Use a pink marker to color the inside of the ear, and a black marker to add a nose and an eye.
More Bear Crafts from Kids Activities Blog & Friends
- Can’t get enough of the polar bear? Try my cardboard tube polar bear craft too!
- Check out this simple way to make a bear drawing with kids.
- Have fun with Goldilocks and the three bears activities.
- There isn’t anything better at bedtime than a lavender bear.
- Here is the cutest panda bear craft! Or learn how to draw a panda bear.
- Have fun with our B is for Bear craft!
- Check out this cute doodle teddy bear coloring page!
more Animal crafts & printables from kids activities blog
- Grab a free giraffe template, ready to print!
Did your kids have fun making the paper plate polar bear craft? What other paper plate crafts do they love?


0