
This DIY dreamcatcher inspired wall hanging is just what your child needs to have good dreams. Keep all those bad dreams away, and make room for sweet dreams with this colorful dream catcher. These step by step tutorials are perfect for kids of all ages, older kids and younger kids, and you just need minimal craft supplies to make this diy modern dreamcatcher. Plus, it’s so much fun to make.
We’ve all seen dreamcatchers being sold in stores, and DIY versions on Pinterest, but do you know the history behind traditional ones?
What is a dreamcatcher?
Native American dreamcatchers trace back to the Ojibwe people and were said to protect children from bad dreams. Traditionally they are made using a willow hoop that contains a ‘spider web’ (that traps bad dreams). The circle hoop represents the sun, and when it rises the bad dreams are supposed to leave. The hole in the center of the web guides good dreams down the feathers to the child.
Teach children about the history of dreamcatchers and the Ojibwe tribe. This is a wonderful learning experience and will help them understand where dreamcatchers originated from. You can find plenty of information online. There are many books you can purchase from book stores or borrow from your local library too.
Make a wall hanging inspired by dreamcatchers
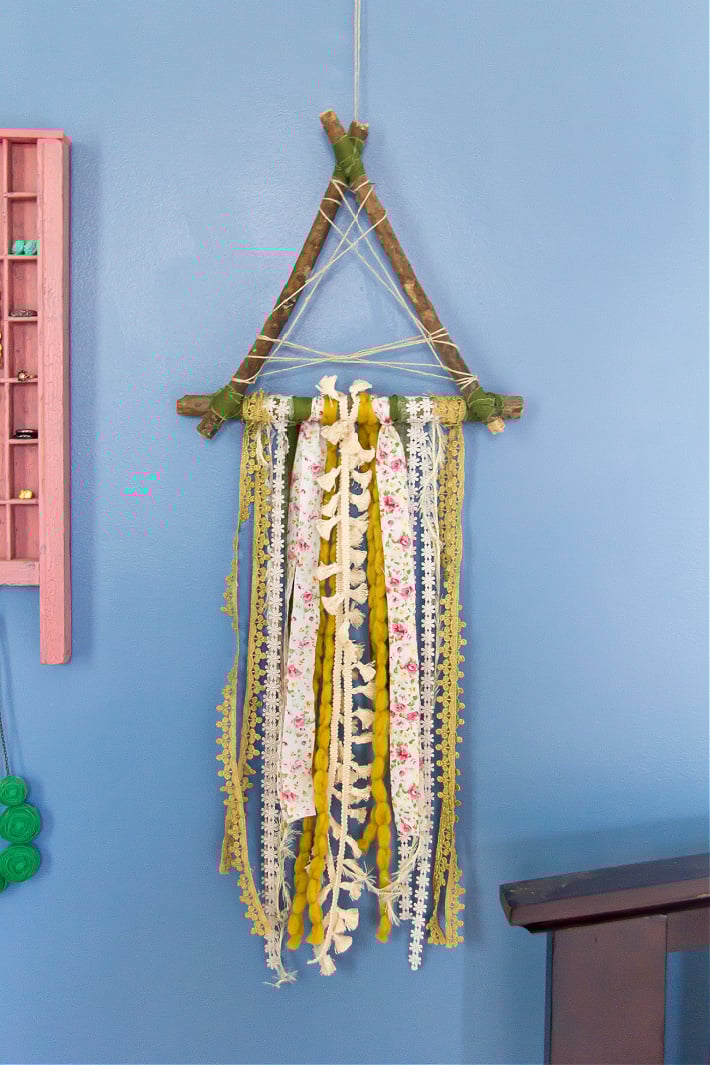
We are not making a traditional dreamcatcher, instead, we are making a wall hanging inspired by them. Kids will love this craft and the end result is something beautiful to hang on their wall. We combined ribbons, lace, fabric scraps, yarn, and twine to make ours.
Related: Check out our other dream catcher crafts!
Supplies Needed To Make These DIY Dream Catcher Craft

Ready to make your own dream catcher? Our dreamcatcher-inspired wall hanging doesn’t use traditional materials instead we’ve used scraps from our craft supplies and sticks from the garden.
- 3 sticks (of even size)
- Scrap fabric, ribbon, lace, yarn, and twine.
- Scissors
How To Make this Lovely Dream Catcher Craft
Step 1

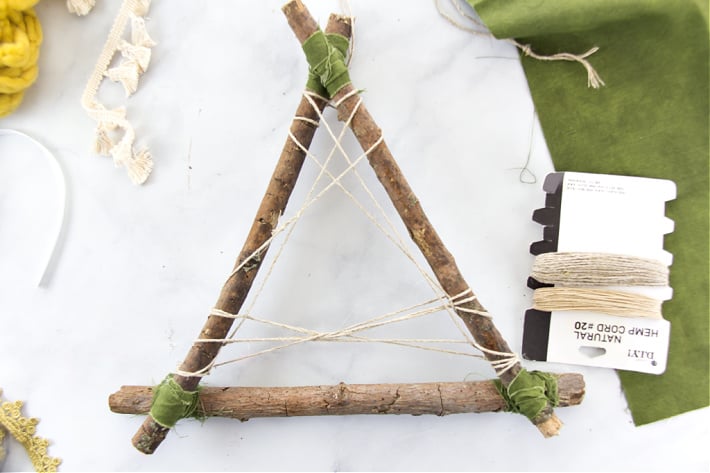
On a flat surface, place the sticks into the shape of a triangle. Tie the overlapping corners together using scraps of fabric, ribbon, yarn, or twine. We used one-inch strips of fabric to tie around ours.
Step 2

Create a ‘web’ in the center of the triangle using twine. Wind it around the sticks from side to side leaving a hole in the center.
Step 3
If you are using fabric on your wall hanging, cut it into strips approximately 1 inch wide. Cut all of your ribbons and scraps the same length or leave them assorted lengths. Ours were different lengths because we used what we had on hand.
Step 4

Fold the scraps in half, making a loop at the fold and place them in the order you want to tie them. This gives you a chance to move things around and see if you need to cut more before tying them on.

You can tie them on with a simple loop knot.
Step 5

Lastly, the final step is to add a loop of twine to the top for hanging on your wall.
DIY Dream Catcher
This dream catcher may not be exactly like a traditional dream catcher, but it still can hand on a bedroom wall just the same. Plus, making your own dream catcher is a great way to also take time to learn and appreciate Native American culture.
You can make as man beautiful dream catchers as you want. You could also make an easy diy dreamcatcher as a gift. This diy version is easy to customize! This unique design allows you to use any types of scrap cloth, ribbon, and lace. It’s the perfect way to tell someone you care! We all need good sleep with less bad dreams.
DIY Dreamcatcher- Inspired Wall Hanging Kids Can Make
Teach kids about the history and traditions behind dreamcatchers, and then make this DIY wall hanging inspired by them.
Materials
- 3 sticks (of even size)
- Scrap fabric, ribbon, lace, yarn, and twine.
- Scissors
Instructions
- On a flat surface, place the sticks into the shape of a triangle. Tie the overlapping corners together using scraps of fabric, ribbon, yarn, or twine. We used one-inch strips of fabric to tie around ours.
- Create a ‘web’ in the center of the triangle using twine. Wind it around the sticks from side to side leaving a hole in the center.
- Fold the scraps in half, making a loop at the fold and place them in the order you want to tie them. This gives you a chance to move things around and see if you need to cut more before tying them on.
- Lastly, the final step is to add a loop of twine to the top for hanging on your wall.
Notes
If you are using fabric on your wall hanging, cut it into strips approximately 1 inch wide. Cut all of your ribbons and scraps the same length or leave them assorted lengths. Ours were different lengths because we used what we had on hand.
More Fun and Simple Crafts From Kids Activities Blog
- Glowing dreamcatcher paper plate craft
- Dreamcatcher coloring page for adults
- We have so many fun 5 minute crafts!
- Check out these construction paper crafts.
- After you make a dreamcatcher, try making some of these pipe cleaner flowers.
- Or try making some straw beads and make your own jewelry.
- Did you know you can make friendship bracelets from LEGOs?
How did your dream catcher turn out?


0