
Grab your paints because today we are making painted Christmas ornaments. Kids of all ages will have a blast designing and painting their own ornaments. These salt dough ornaments are so easy to make and the designs are festively fun! Make these painted Christmas ornaments at home or in the classroom!

Painted Christmas Ornaments
Homemade ornaments are the best. Which is why we are excited to share this painted salt dough ornament craft. Explore colors, different painting techniques, practice fine motor skills with this fun holiday craft.
This budget-friendly Christmas craft only use a few art supplies like salt, flour, water, and paint! You can hang these painted ornaments on your own Christmas tree or give them as a gift. Plus, they make great keepsakes! So, without further ado, let’s make painted Christmas ornaments.
This post contains affiliate links.
Related: Make this salt dough nativity Christmas ornament!
Supplies Needed To Make Painted Christmas Ornaments
Salt Dough Recipe:
- 2 Cups All Purpose Flour
- 1 Cup Salt
- 3/4 Cup Warm Water*
Other Craft Supplies:
How To Make Painted Salt Dough Christmas Ornaments
Step 1

Mix together the flour and salt and add the warm water and mix until you have a dough formed.
Step 2

Roll out your dough until it is about 1/4-1/2 inch thick. Use a circle cookie cutter, or glass cup, to cut out a circle from the dough.

Make sure your circle is flat on top.
Step 3
Bake your ornaments for 2-4 hours at 200 degrees F or you can let them air dry for 72 hours.
Decorating Your Painted Ornaments
Snow Globe Ornament
Step 1

Paint the circle black.
Step 2

Draw a snow globe using white paint. A circle for the globe, and two lines out from the bottom and a horizontal line to make the base.
Craft Notes:
You can use paint pens to make the drawing easier.
Step 3

Paint in the snow at the bottom. It doesn’t have to be perfectly white, because snow has shadows too.
Step 4

Paint snow in the snow globe.

Draw a house in the snow globe. Square bottom, triangle top, and don’t forget the chimney.
Step 5

Paint the house a light brown.

Add dark brown details over the light brown and use black to paint slats into the cabin.
Step 6

Add snow on top of the roof and chimney of the cabin.
Step 7

Using green paint, paint a tree on either side of the cabin.
Step 8

Paint a door and window on the cabin. Don’t forget to also add snow into in your snow globe by dotting white paint throughout.
Step 9

Go around the door and window with darker paint and add a door knob and frame in the window. Paint the base of the snow globe blue. And then dapping your paintbrush in white paint, flick snow around your snow globe on the white paint.
Step 10
Cut a string, thread it through the hole, and tie it into a knot.
Holiday Berry Ornament
Step 1

Paint your ornament white.
Step 2

Using brown paint, paint some branches and some smaller branches jutting off of those ones.
Step 3

Using green paint, paint needles or leaves on each branch. Leaves on the right side need to go right, and leaves on the left need to go left.
Step 4

Dab red berries throughout the branches on their own or in clusters.
Step 5
Cut a string, thread it through the hole, and tie it into a knot.
How To Make These Painted Christmas Ornament Crafts Your Own
Like our other crafts, you can change up the way you do this painted ornament craft to make it fit your family’s needs. You can do stuff like:
- Paint different pictures.
- Cut out different shapes in the dough.
- Use hooks, yarn, twine, or ribbon to hang the ornament.
- Add glitter.
- Use stickers.
- Once the paint is dry, draw the picture using markers.
- Instead of using acrylic paints, use water paints on your hand-painted Christmas ornaments.
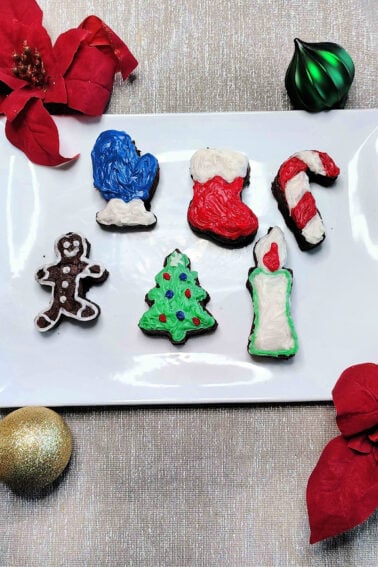
- Paint them to look like Santa’s cookies.
- Use glitter pens to add some sparkle to your snow.
- Use these beautiful ornaments as holiday decor around the house instead of on the tree.
- Use mod podge and paper and add florals, new paper, or any other images you like.

Our Experience With This Painted Christmas Ornament Craft
We had so much fun making these painted ornaments. We even made extra to send to Gramma and Grampa (that’s how they spell it). These ornaments really do make cute keepsakes, and you can add the year to them so you know when they were made.
We watched Rudolph while we made these. Nothing beats comfy jammies, a classic Christmas movie, a fun craft, and more importantly your family. It just really makes Christmas feel like Christmas especially if you’re like me and running around like a mad woman trying to get everything done.
Presents, dinners, parties, decorations, all that is fun. But sometimes it’s fun to slow down and enjoy your kids being little and joyful over the small things. I hope your family enjoyed this craft as much as mine did. Merry Christmas!
MORE HOMEMADE CHRISTMAS ORNAMENTS FROM KIDS ACTIVITIES BLOG
- If you loved this DIY popsicle stick ornament, then you definitely won’t want to miss this awesome list of Christmas ornaments kids can make!
- We have over 100 Christmas crafts kids can make that come straight from the North Pole.
- Homemade ornaments have never been easier…clear ornament ideas!
- Turn kids artwork into ornaments to give or decorate for the holidays.
- Easy salt dough ornament you can make.
- Pipe cleaner Christmas crafts turn into ornaments to hang on the Christmas tree.
- One of our favorite painted Christmas ornaments starts with clear glass ornaments.
- Make a toilet roll reindeer 3 different ways!
- Have you tried making this snowflake ornament craft?
- You can make your own watercolor Christmas tree tags.
- Have you tried our great xmas craft?
- Have you tried putting your child’s art on a custom Christmas ornament.
- This Christmas Mandala art craft is just too fun!
- Check out this super fun paper punch ornament craft!
- I love these easy salt dough and cookie cutter ornament craft!
- You can’t miss out on this paper plate polar express craft!
- I love this super creative and cute Gingerbread man craft!
- Check out these adorable salt dough candy canes!
How did your painted Christmas ornaments turn out?


0