Kids love this
Fun DIY Stamped T-Shirt Tutorial! It’s perfect for summer and let’s kids get their creative juices flowing. Parents can help smaller kids with this project and older kids can do it on their own. Either way, kids will love having their very own unique t-shirt this summer.
Our
Make Your Own Stenciled Shirt tutorial is another way to make your own shirt using tshirt stencils.

You probably already have most of the supplies on hand to make our Fun DIY Stamped T-Shirt, but if not you can easily purchase them for very low cost.

We live on a farm and raise dairy goats (and other such farm animals), so my youngest son decided to use a goat head stencil.
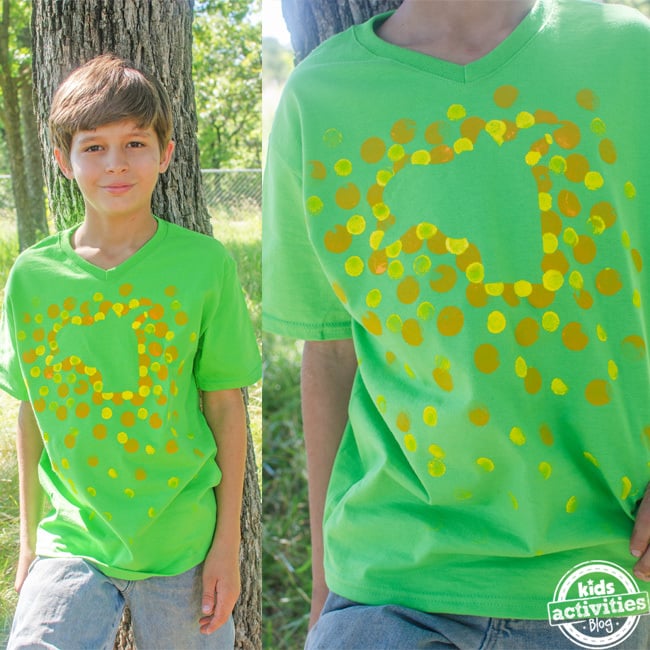
What you need to make our Fun DIY Stamped T-Shirt:
Fun DIY Stamped T-Shirt
- Plain t-shirt in your choice of color
- 2-3 different colors of acrylic paint
- Sponge stencil brushes (you could also use the eraser on the back of a pencil)
- Large piece of cardboard or foam board
- Shape stencil (we found an image we liked online and printed it off)
- Clothespins or clips
Directions
Stretch t-shirt over cardboard or foam board and secure into place using clothespins.


Center stencil on t-shirt over the chest area.
Holding the stencil with one hand dab acrylic paint in one color around the stencil with brush. You’ll want the paint to partially touch the stencil so you can see the shape when you are done. Repeat with the next color like so:


Allow to dry thoroughly. We let ours dry overnight.

Remove from cardboard (it may stick a little bit) and have fun wearing your new shirt! To wash, turn inside out and launder like normal. We hope you like our Fun DIY Stamped T-Shirt Tutorial!

 You probably already have most of the supplies on hand to make our Fun DIY Stamped T-Shirt, but if not you can easily purchase them for very low cost.
 We live on a farm and raise dairy goats (and other such farm animals), so my youngest son decided to use a goat head stencil.
 What you need to make our Fun DIY Stamped T-Shirt:

 Center stencil on t-shirt over the chest area.
Holding the stencil with one hand dab acrylic paint in one color around the stencil with brush. You’ll want the paint to partially touch the stencil so you can see the shape when you are done. Repeat with the next color like so:


 Allow to dry thoroughly. We let ours dry overnight.
 Remove from cardboard (it may stick a little bit) and have fun wearing your new shirt! To wash, turn inside out and launder like normal. We hope you like our Fun DIY Stamped T-Shirt Tutorial!




0